Using Tenderly to troubleshoot and simulate smart contracts

Every now and then I'll get a DM about an issue with a smart contract looking to see if I can help figure out what could be going wrong. Most of the time we can review code via local IDE, sometimes these contracts are deployed and already being used and errors are happening on chain. This is how I discovered Tenderly It is an amazing tool that lets you debug transactions and visually go through the flow of a contract passing through each of the libraries to help you figure out some of those mystic error returns. For this tutorial, we will be covering a quick breakdown of an NFT contract, how to load a deployed verified contract, run a simulation and debug the transactions with a few little tricks as well.
NFT SMART CONTRACT
I put together an example smart contract so we can dissect the issues and the flow of the smart contract.
// SPDX-License-Identifier: MIT
pragma solidity >=0.7.0 <0.9.0;

import "@openzeppelin/contracts/token/ERC721/ERC721.sol";
import "@openzeppelin/contracts/token/ERC721/extensions/ERC721Burnable.sol";
import "@openzeppelin/contracts/access/AccessControl.sol";
import "@openzeppelin/contracts/utils/Strings.sol";
import "@openzeppelin/contracts/utils/Counters.sol";

contract Tenderly is ERC721, ERC721Burnable, AccessControl {
    using Strings for uint256;
    using Counters for Counters.Counter;

    Counters.Counter private _tokenIdCounter;

    bytes32 public constant DEV_ROLE = keccak256("DEV_ROLE");
    bytes32 public constant MINTER_ROLE = keccak256("MINTER_ROLE");

    uint256 public constant PRICE = 0.00001 ether;

    string private baseTokenUri;
    string private hiddenURI;
    bool public isRevealed;

    //events
    event adminMinted(address minter, uint256 _id);
    event roleMinted(address minter, uint256 _id);

    constructor(string memory _hiddenURI, string memory _URI, address _mintRole, address _devRole) ERC721("Billyjitsu", "BJT") {
        _grantRole(DEFAULT_ADMIN_ROLE, msg.sender);
        _grantRole(MINTER_ROLE, _mintRole);
        _grantRole(DEV_ROLE, _devRole);
        //start at token ID 1
        _tokenIdCounter.increment();
        hiddenURI = _hiddenURI;
        baseTokenUri = _URI;
    }

    function _baseURI() internal view virtual override returns (string memory) {
        return baseTokenUri;
    }

    function mint(address to) external payable {
        require(msg.value >= PRICE); //No error message
        uint256 tokenId = _tokenIdCounter.current();
        _tokenIdCounter.increment();
        _safeMint(to, tokenId);
    }

    //Only chosen address can allow mints
    function roleMint(address to) external onlyRole(MINTER_ROLE) {
        uint256 tokenId = _tokenIdCounter.current();
        _tokenIdCounter.increment();
        _safeMint(to, tokenId);

        emit roleMinted(to, tokenId);
    }

    function admintMint(address to) external onlyRole(DEFAULT_ADMIN_ROLE) {
        uint256 tokenId = _tokenIdCounter.current();
        //missing increments
        _safeMint(to, tokenId);

        emit adminMinted(to, tokenId);
    }

    //To continue after breaking
    function increaseId() external onlyRole(DEFAULT_ADMIN_ROLE) {
        _tokenIdCounter.increment();
    }

    //allow the developer to reveal only
    function toggleReveal() external onlyRole(DEV_ROLE){
        isRevealed = !isRevealed;
    }

    //return uri for token Hidden/Reveal
    function tokenURI(uint256 tokenId) public view virtual override returns (string memory) {
        require(_exists(tokenId), "ERC721Metadata: URI query for nonexistent token");

        if(!isRevealed){
            return hiddenURI;
        }
        return baseTokenUri;
    }

    // Override for AccessControl and 721
    function supportsInterface(bytes4 interfaceId)
        public
        view
        override(ERC721, AccessControl)
        returns (bool)
    {
        return super.supportsInterface(interfaceId);
    }

    //Limited only to the admin to pull funds
    function withdraw() external onlyRole(DEFAULT_ADMIN_ROLE) {
        (bool delivered, ) = payable(msg.sender).call{value: address(this).balance}("");
        require(delivered);
    }
}
Let's break it down really quickly. This is a simple OpenZeppelin ERC721 contract that most are used to seeing. To spice it up a little, instead of using the common "onlyOwner" library, we are using Access Control to create "roles" for different wallets to have permissions to use certain functions. You'll see that in the early part of the contract (DEV_ROLE, MINTER_ROLE) and give the wallet permissions in the constructor
import "@openzeppelin/contracts/access/AccessControl.sol";
......

bytes32 public constant DEV_ROLE = keccak256("DEV_ROLE");
bytes32 public constant MINTER_ROLE = keccak256("MINTER_ROLE");
......

constructor(string memory _hiddenURI, string memory _URI, address _mintRole, address _devRole) ERC721("Billyjitsu", "BJT") {
        _grantRole(DEFAULT_ADMIN_ROLE, msg.sender);
        _grantRole(MINTER_ROLE, _mintRole);
        _grantRole(DEV_ROLE, _devRole);
        //start at token ID 1
        _tokenIdCounter.increment();
        hiddenURI = _hiddenURI;
        baseTokenUri = _URI;
    }
We aren't going to dig too deep into this as it is not the focus of this tutorial but I want to make you aware that such things exist. Many times, leaving the function to one address gives too much power and a shared consensus of different responsibilities would like to be used among different users. Ex. Only the admin can withdraw funds.
//Only chosen address can allow mints
    function roleMint(address to) external onlyRole(MINTER_ROLE) {
        uint256 tokenId = _tokenIdCounter.current();
        _tokenIdCounter.increment();
        _safeMint(to, tokenId);

        emit roleMinted(to, tokenId);
    }

  function admintMint(address to) external onlyRole(DEFAULT_ADMIN_ROLE) {
        uint256 tokenId = _tokenIdCounter.current();
        //missing increments
        _safeMint(to, tokenId);

        emit adminMinted(to, tokenId);
    }

//allow the developer to reveal only
   function toggleReveal() external onlyRole(DEV_ROLE){
        isRevealed = !isRevealed;
    }
You will notice that there are a few bugs in the code. That is on purpose as we want to run into those issues when we run the simulations.
I've gone ahead and deployed this contract to Gnosis chain, one of my favorite chains to work with. For those that don't know, it is home to some of the most innovative Dapps that have come to be used across many ecosystems. Safe (formerly Gnosis Safe) is a great example. The chain is also one of the cheapest to work with being a stable coin gas system. It is definitely worth checking out.
Using Tenderly
Upon going to https://tenderly.co/ you will need to setup and account. You can do it with your github, google or just an email account. Free and easy
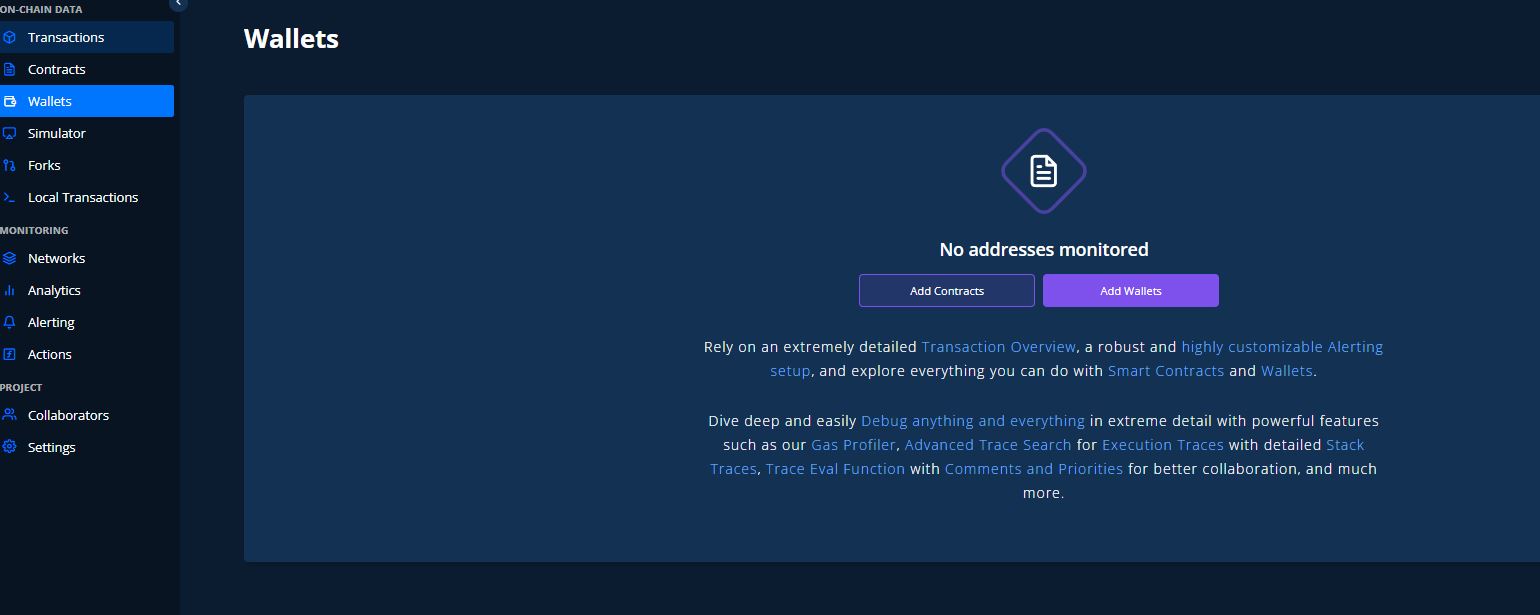
Once you log in, it will be pretty bare at the start but let's take a look at the "on-chain data"
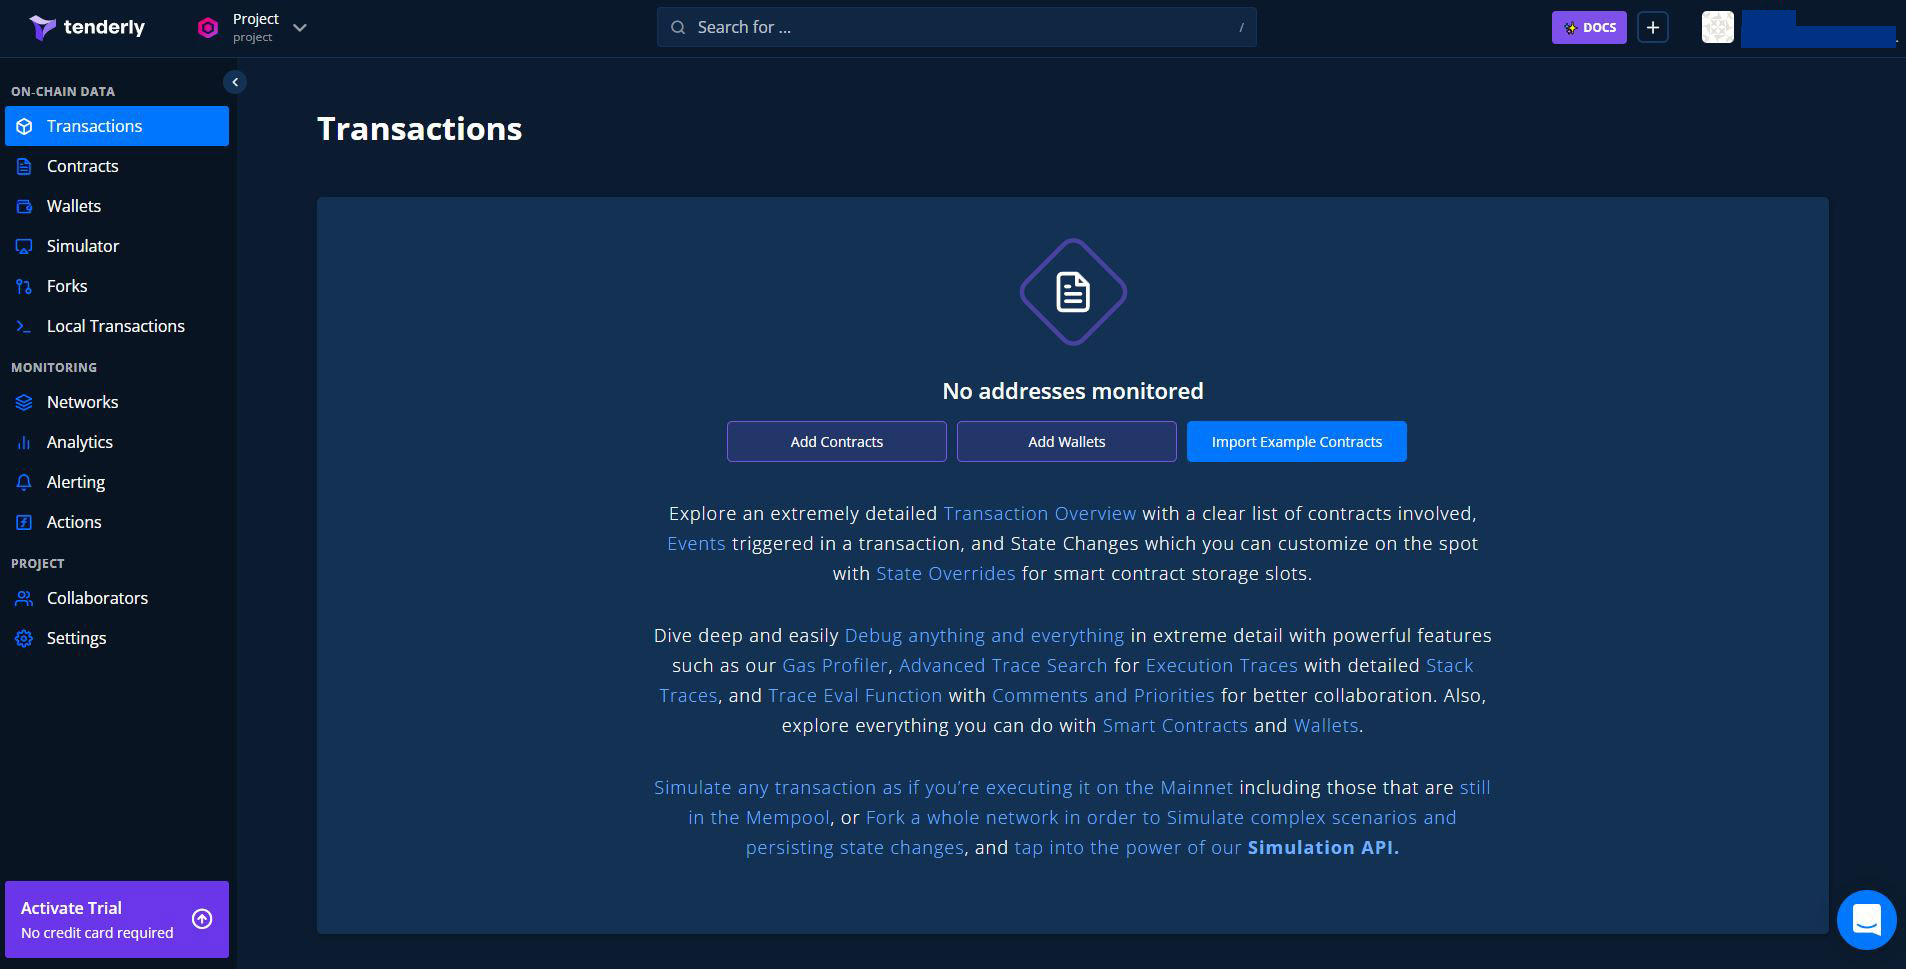
Transactions: Will show you the transactions that occured on the smart contract you have loaded to your project. Very similar to etherscan. It will give you a few options to work with once loaded per each transaction.
Contracts: This is where you can choose the contracts to load in to your projects. Tenderly supports a wide range of networks from Mainnet ethereum to Kiln network.
Wallets: This allows you to behave like a certain wallet in a simulation. Want to be a whale and see how swapping a large amount would be like? You can do it. Want to be the admin of a contract and test functions? We are going to do that.
Simulator: It was you would expect it to be... A simulator of a contract, where you can test run scenarios from live wallets and live contracts.
Forks and Local Transactions: We won't be covering this today but Forks, let you fork the contracts at a give block time to experiment with complex scenarios and local transactions is something you can import to run differences in small nodes and production networks. This would require a much much larger tutorial.
Let's go ahead and add our contract to our Tenderly page. Our contract is deployed on Gnosis chain at : 0xBCa4D16C3801CB50ceA32bba6759e96f5d46E896
One thing to notice is you can also "Import Example Contracts" this well bring in slightly more complicated contracts with more transactions to play with as well. For now we will just bring in ours via "Add Contracts"
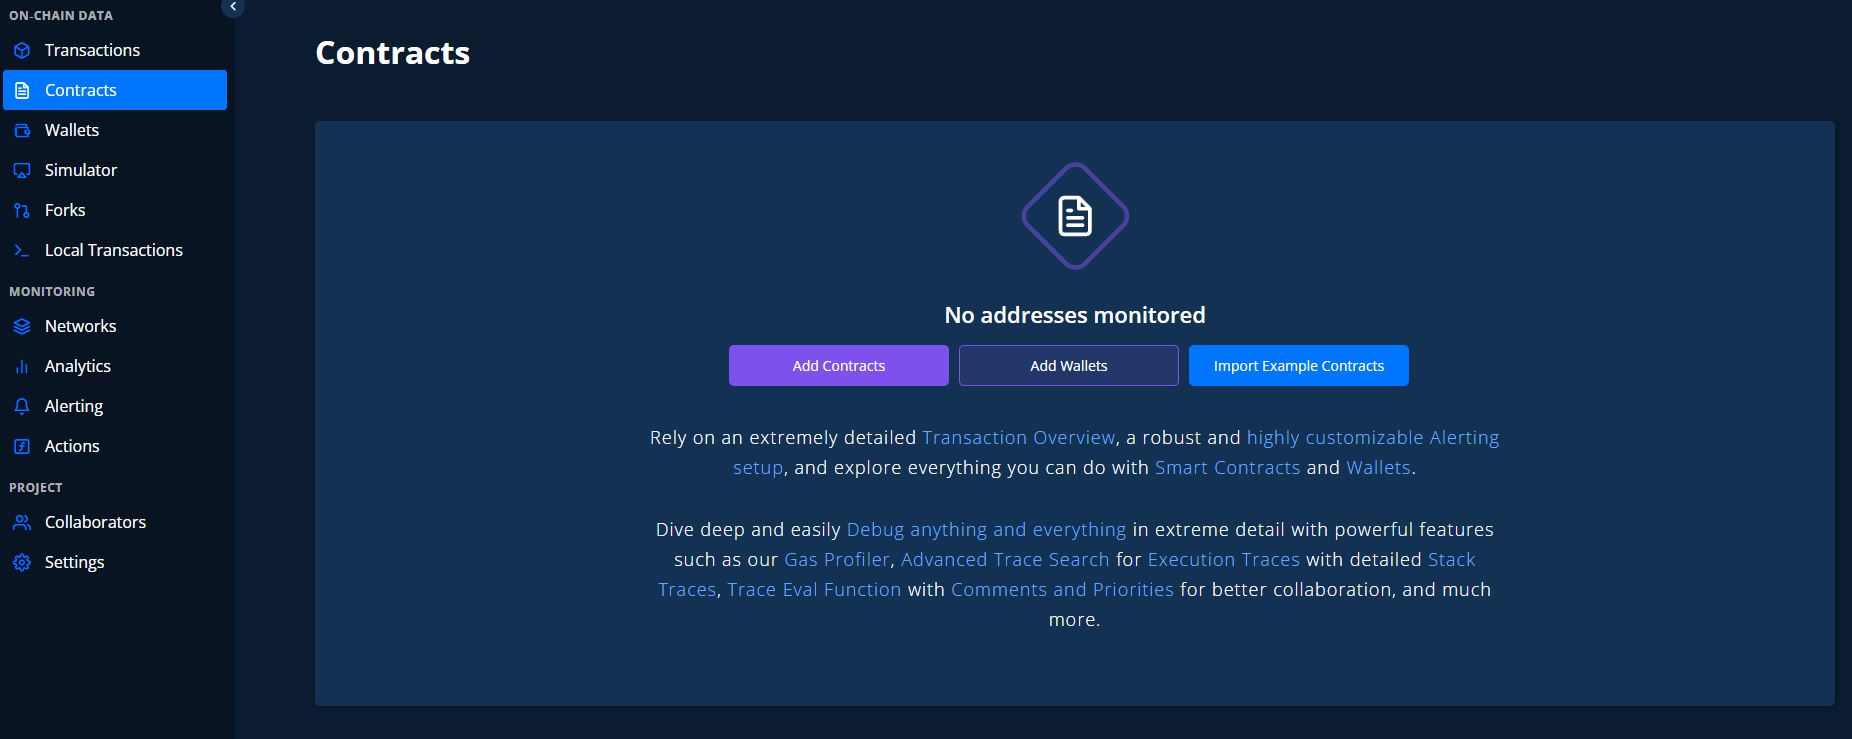
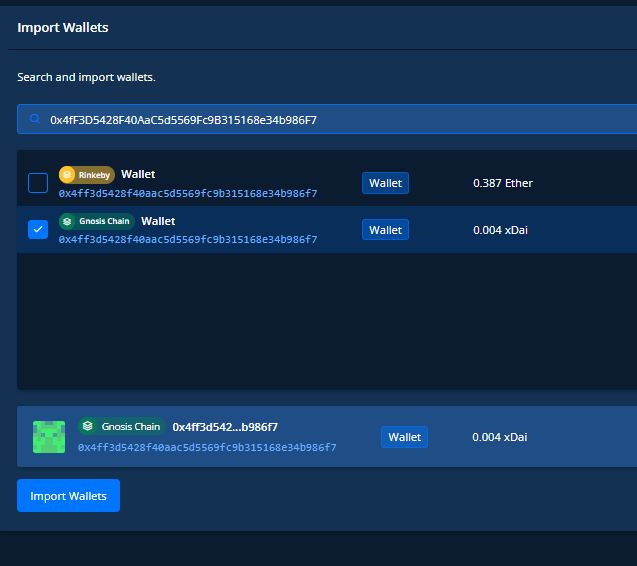
Once we click on "Add Contracts" we will get the option to "Import Verified" and put in our contract address as so:
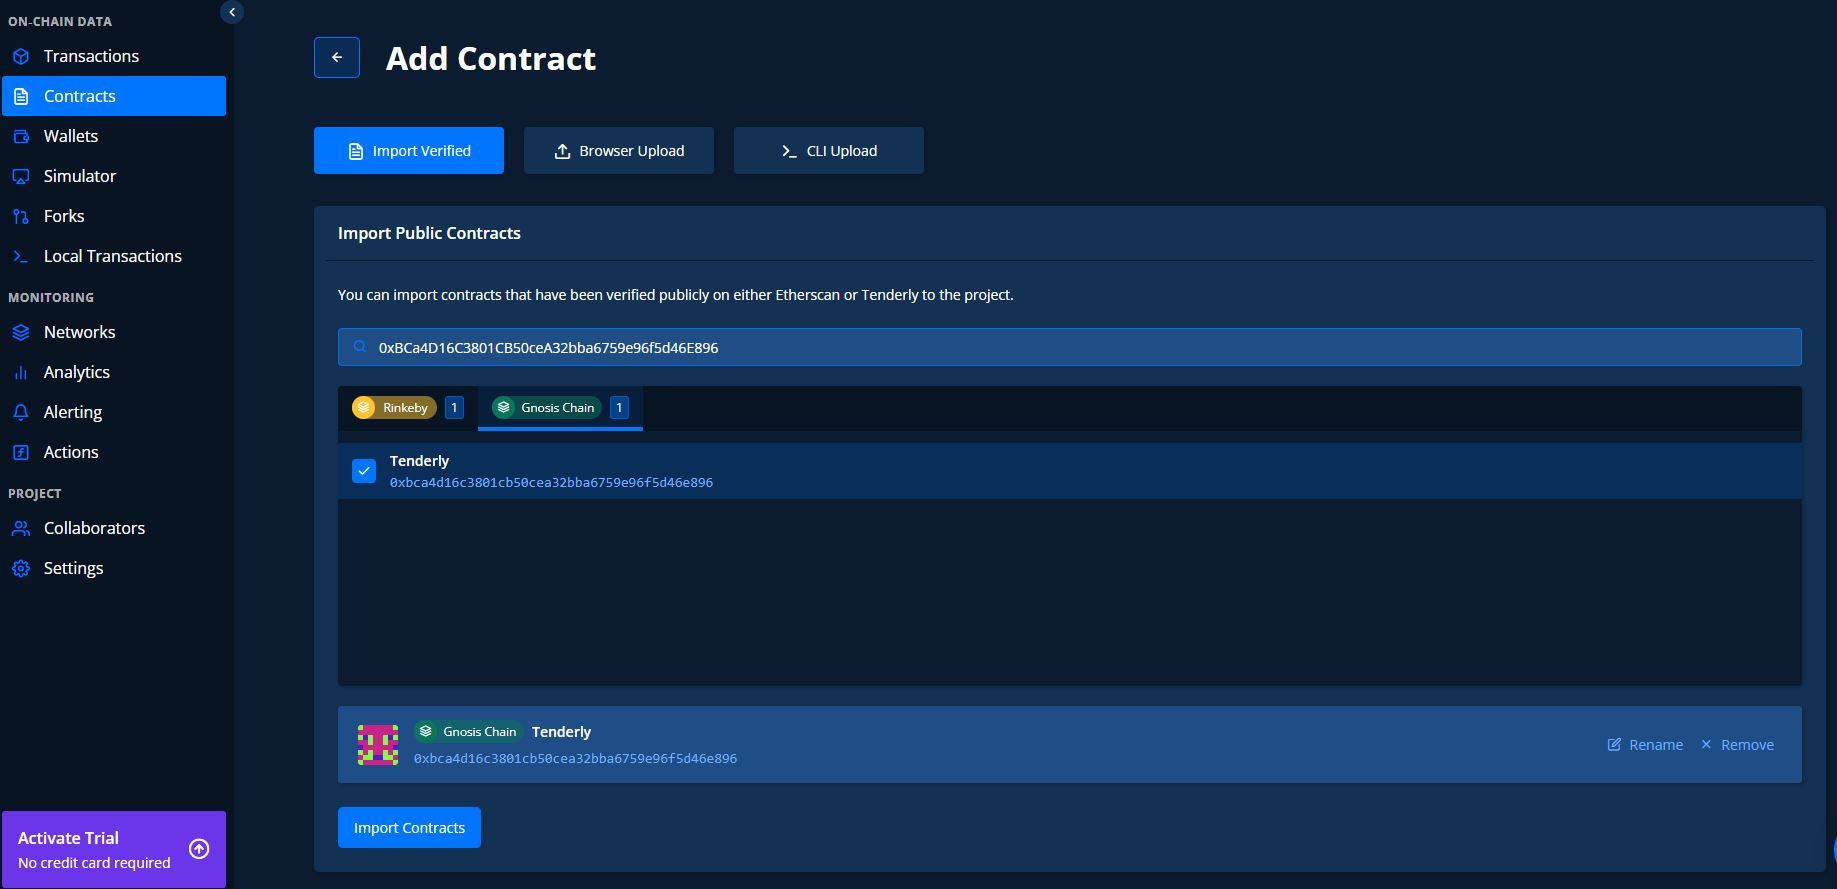
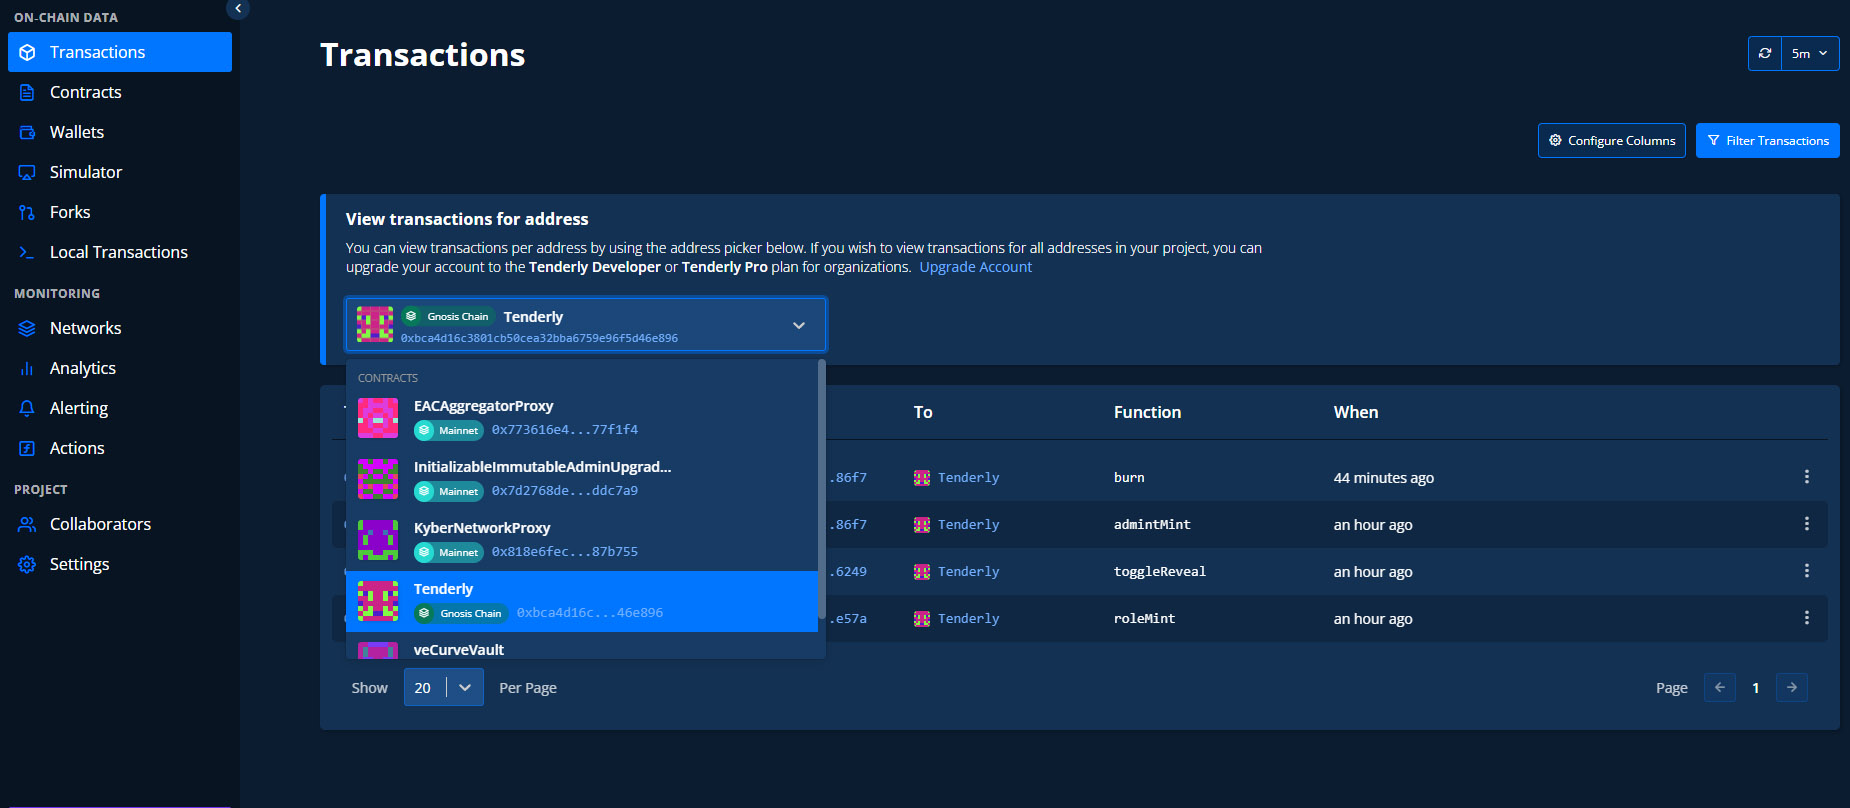
You will notice that we have a two chains to pick from. Since Tenderly can handle multiple chains, it will search all chains based on the contract address and return all possibilities. Make sure we highlight "Gnosis Chain" (I named the contract Tenderly) and click on "Import Contracts" on the bottom.
Once successfully added, it will show up on your list of contracts, you can add more contracts to explore if you like but there is a limit on the free version.

Let's go back and visit the "Transactions" tab. Make sure to have the correct contract loaded so you can view the transactions and information on that contract.
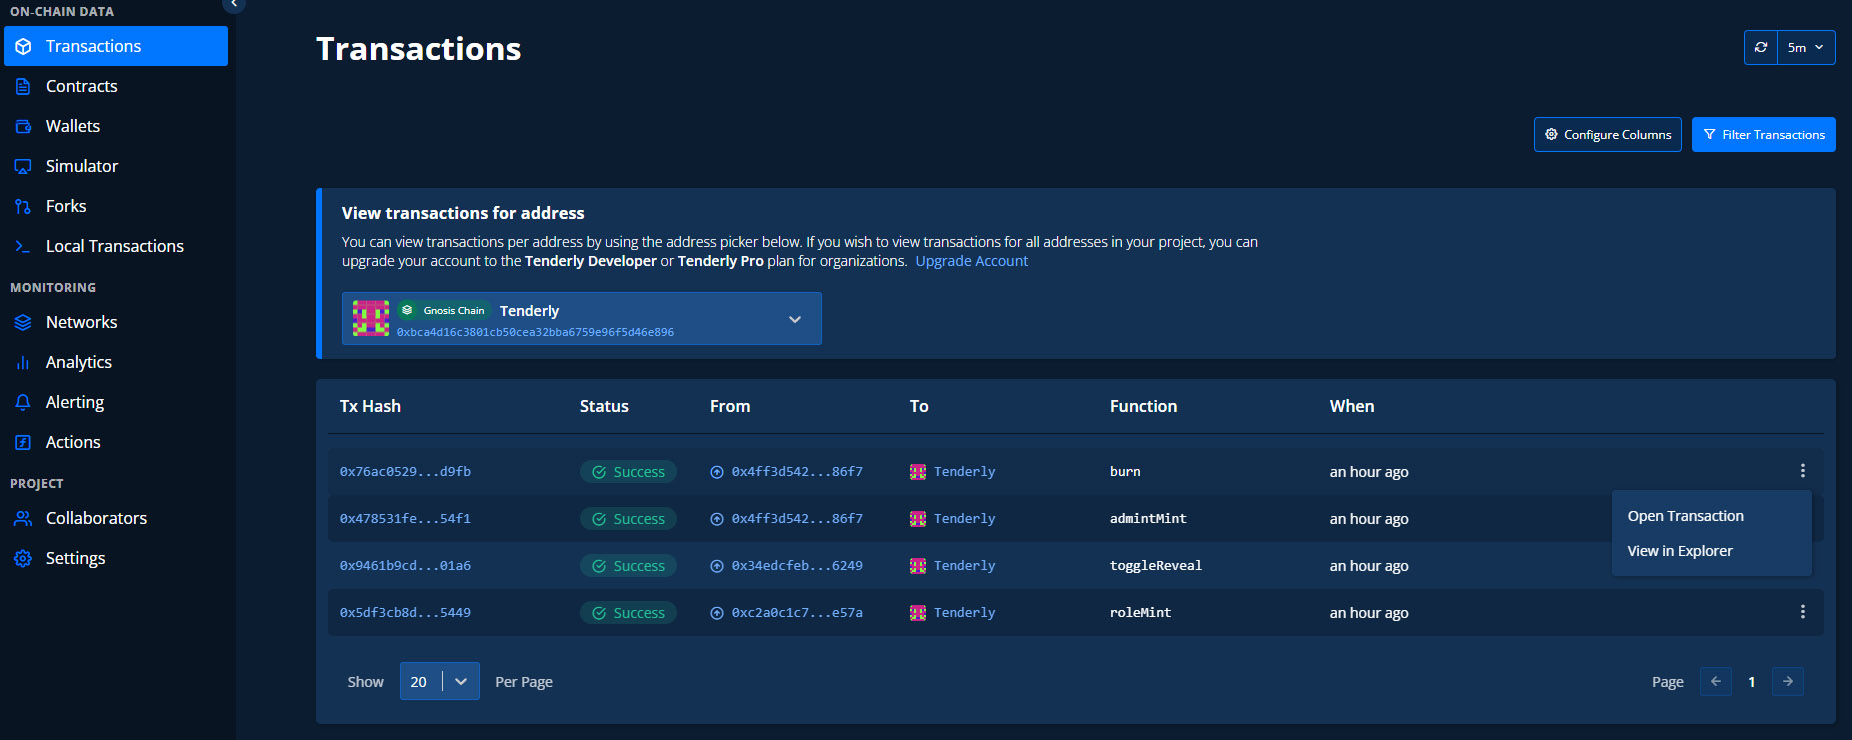
Once, you have the contract loaded, you can see all the transactions that have happened on that contract. On the far right of each transaction with the three dots, you have the option to look at it on the block explorer (View in Explorer) or to get more details in the Open Transaction.
This is where the power of the Tenderly tool really shines. We can deep dive into the transaction details of everything that went on in that specific transaction.
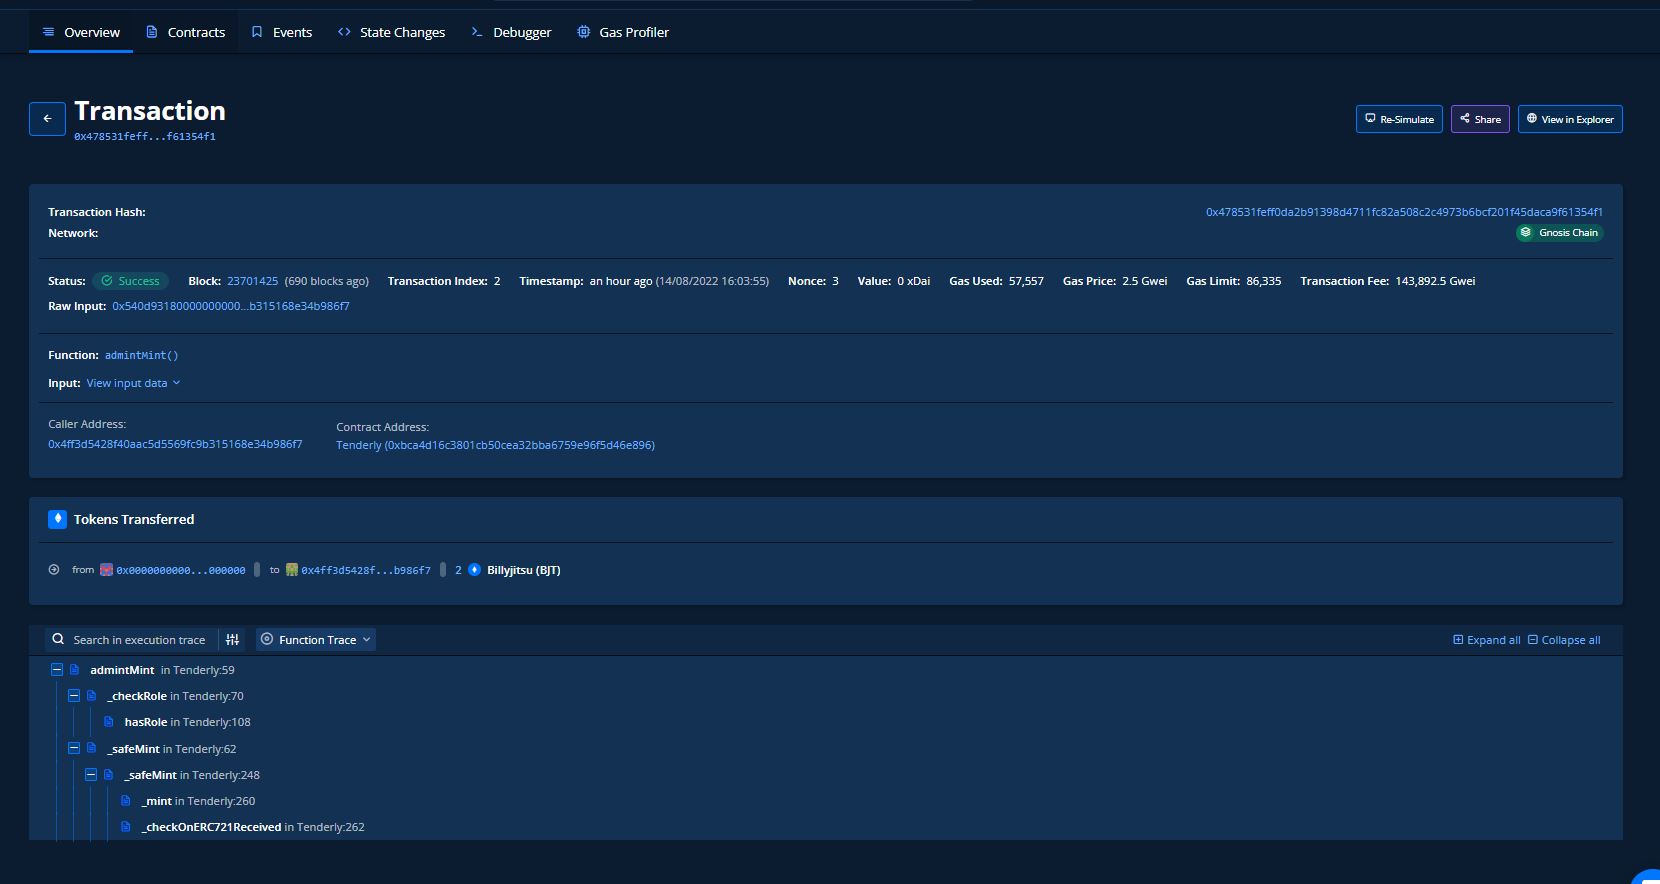
It gives you a nice clean look of what you with get on etherscan/blockscout and the actions of what happened but what really makes it stand out is the "Function Trace" at the bottom. It shows you the flow of each function it went through to complete the transaction. Very powerful.
If you click on any of the actions within the function trace, it will take you to the line of code that it used to verify and continue to the next step in the code.
You will also, notice towards the top right, there is a "View in Debugger." This is where the real magic shows. Let's go ahead and click to explore that.
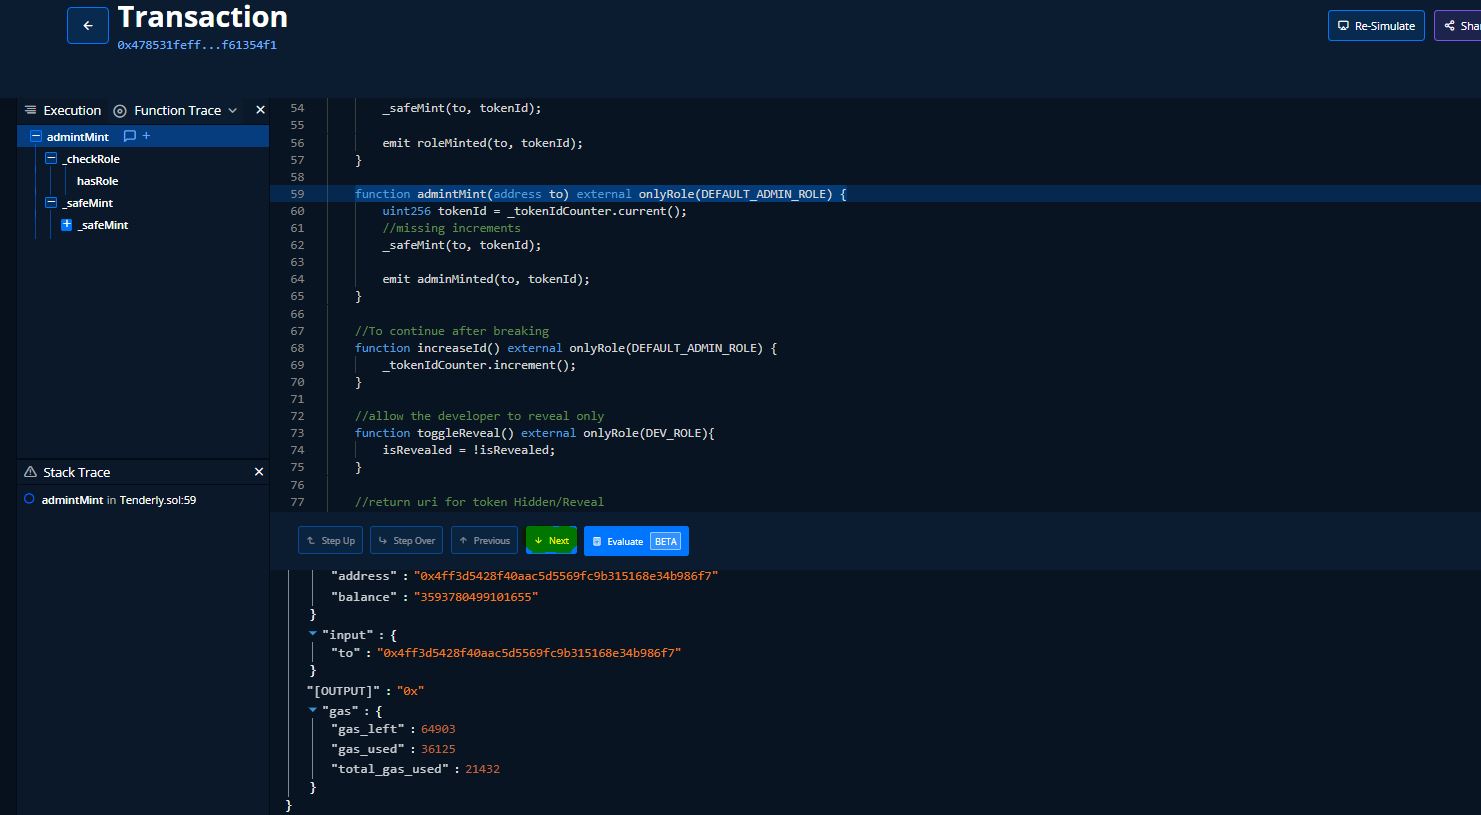
What we see here is the entire flow of the "adminMint" function call. The adminMint is highlighted on the left and also highlighted on the right where the call is being done base on our deployed code. On the bottom window, it gives us details about the call, who called, inputs, total gas, gas used for that specific call and gas left (this is handy). I highlighted the "Next" button because when you click that it takes you to the next step in the function call. Let's go ahead and click it.
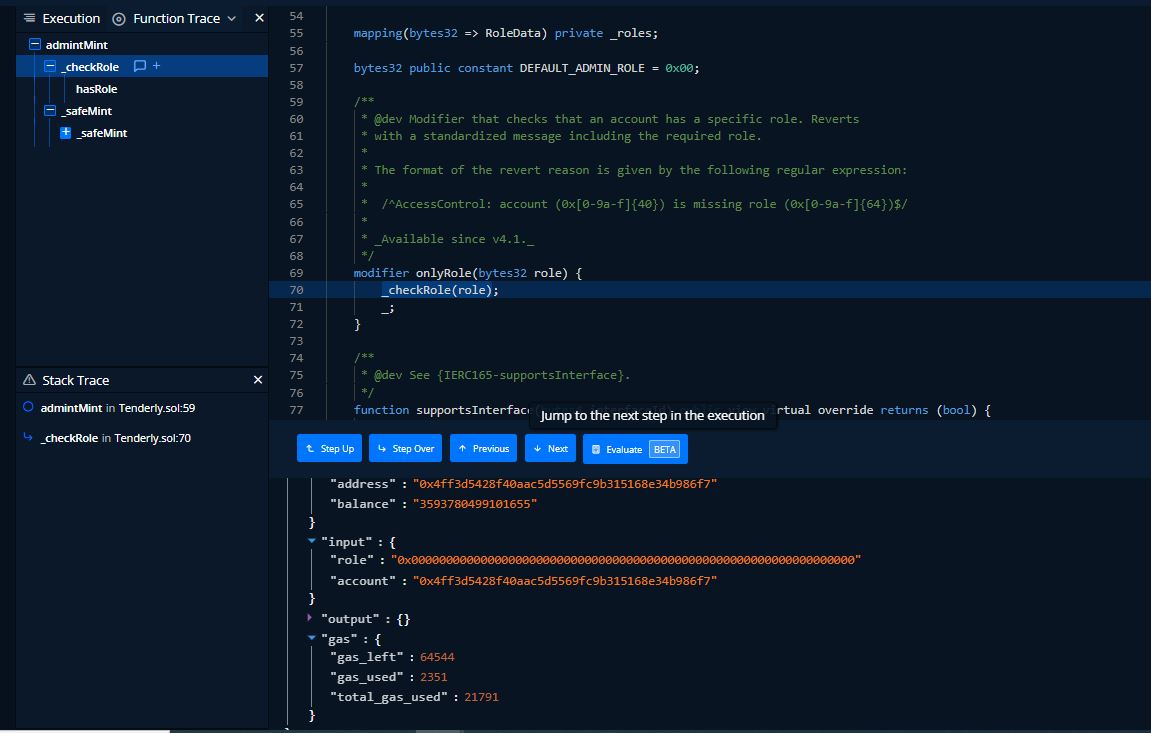
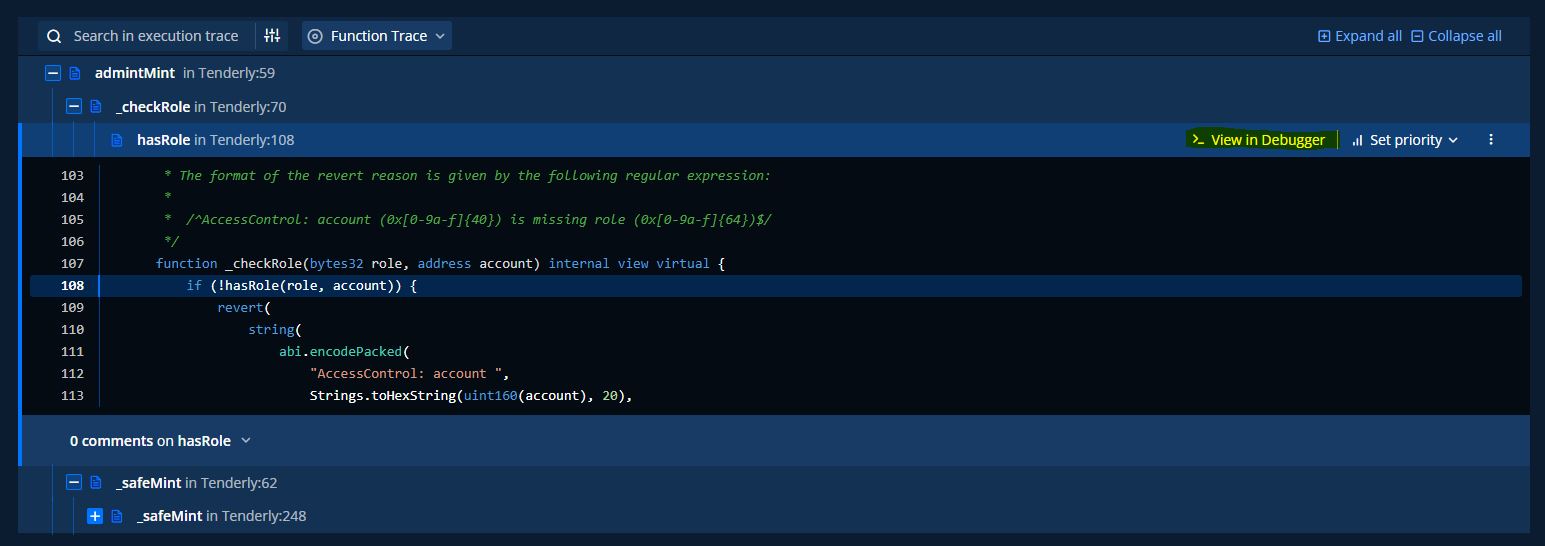
You will notice that we went from "admintMint" on the top right to the next step down to "_checkRole" with the corresponding highlight to our code on the right. You may have noticed that we didn't write that code but it is being used from our import of AccessControl.sol. If we remember correctly, the admintMint function has a role checker:
function admintMint(address to) external onlyRole(DEFAULT_ADMIN_ROLE) {
So the code must take us there to verify that to role is valid before proceeding with the function call.
Let's continue to click "Next" on the debugger to continue on to the next step.
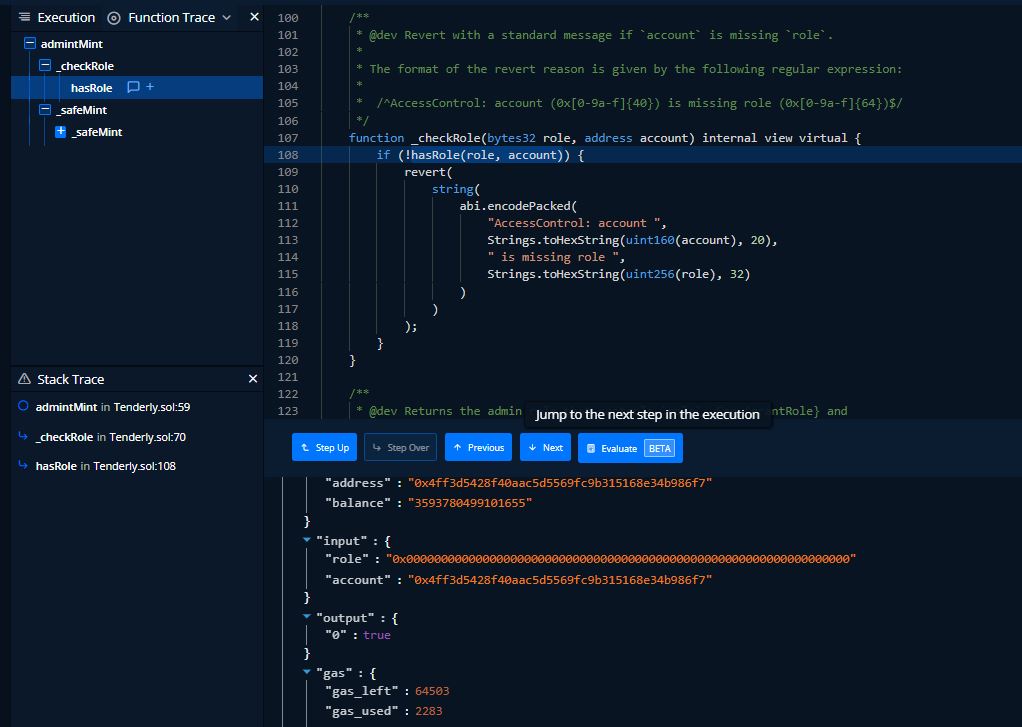
As expected, we are continuing to verify the Role status of the caller to the function. If you notice on the bottom window the "Output" is set to "TRUE" so we continue on. Go ahead and click on "Next"
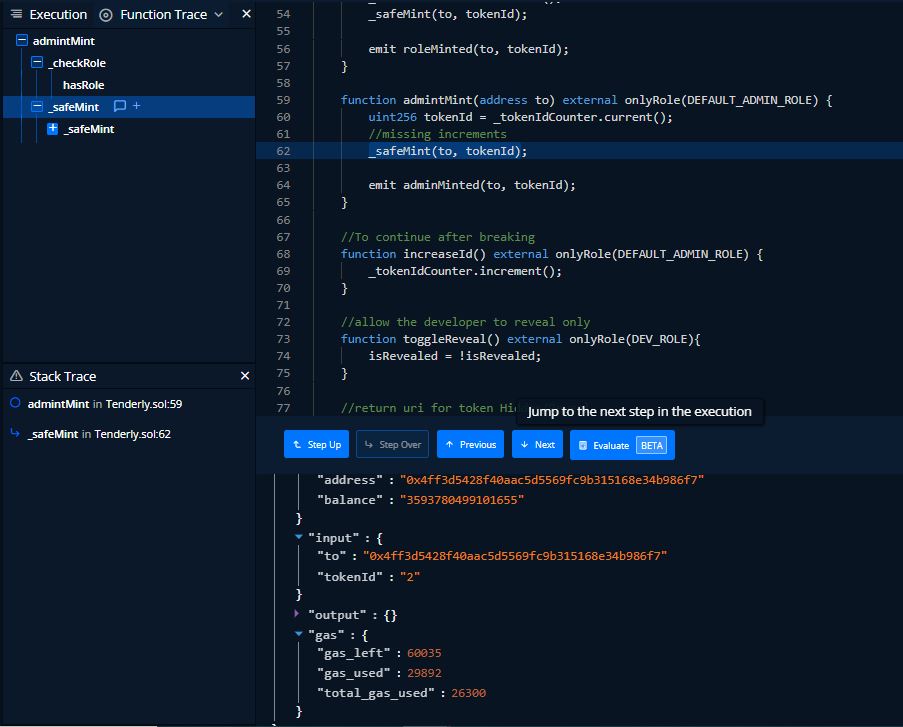
As expected, we are verified to continue on with the call and now we are calling _safeMint with the specified address and token ID. Let's go ahead and continue on with hitting "Next"
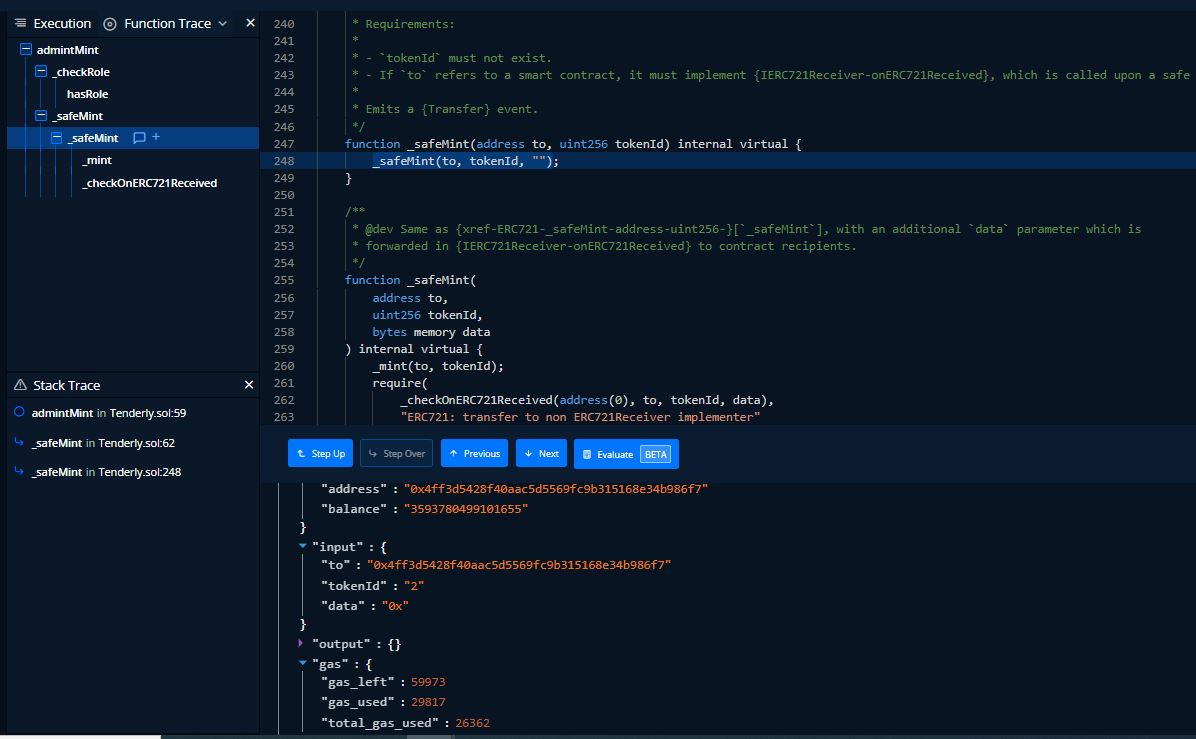
We not jump to the imported ERC721.sol portion of the contract where we are actually calling the _safeMint function. You can guess where it goes from here.

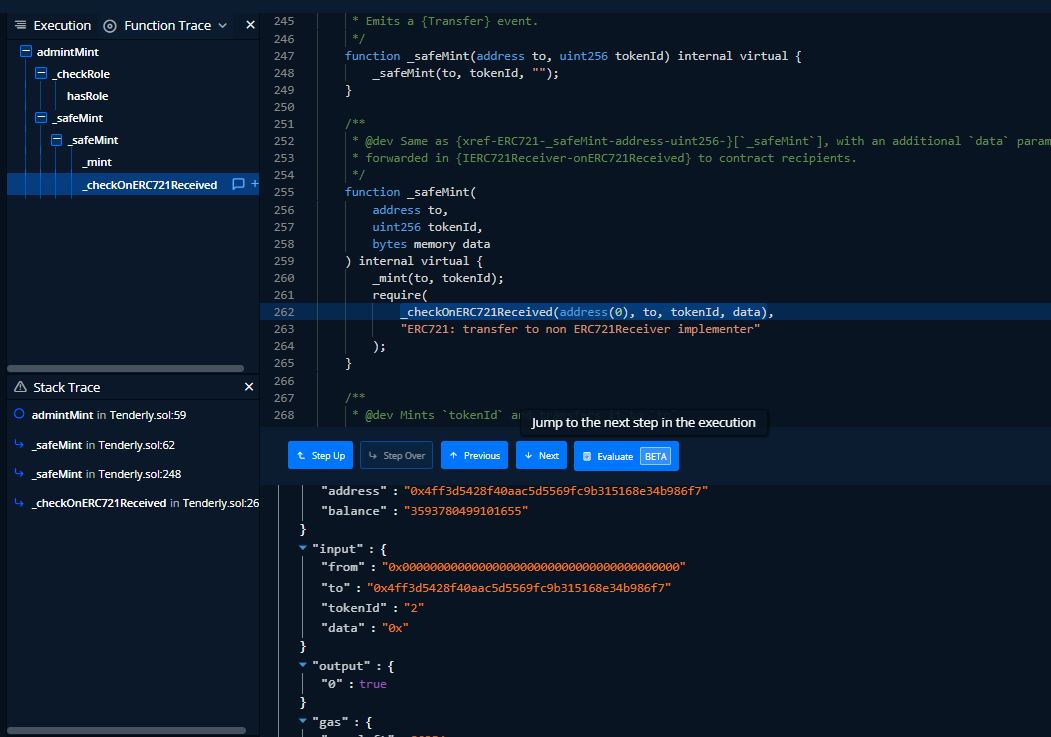
Success, we used our admin privileges to call on the function and successfully mint the NFT. The debugger took us on a tour of the exact path through all the imported libraries, line by line to help us get a clearer understanding of what is happening behind the call.
So great, we got to analyze a function call that was a success. Big deal, how to do we figure what went wrong? This is where I like to run the Simulator.
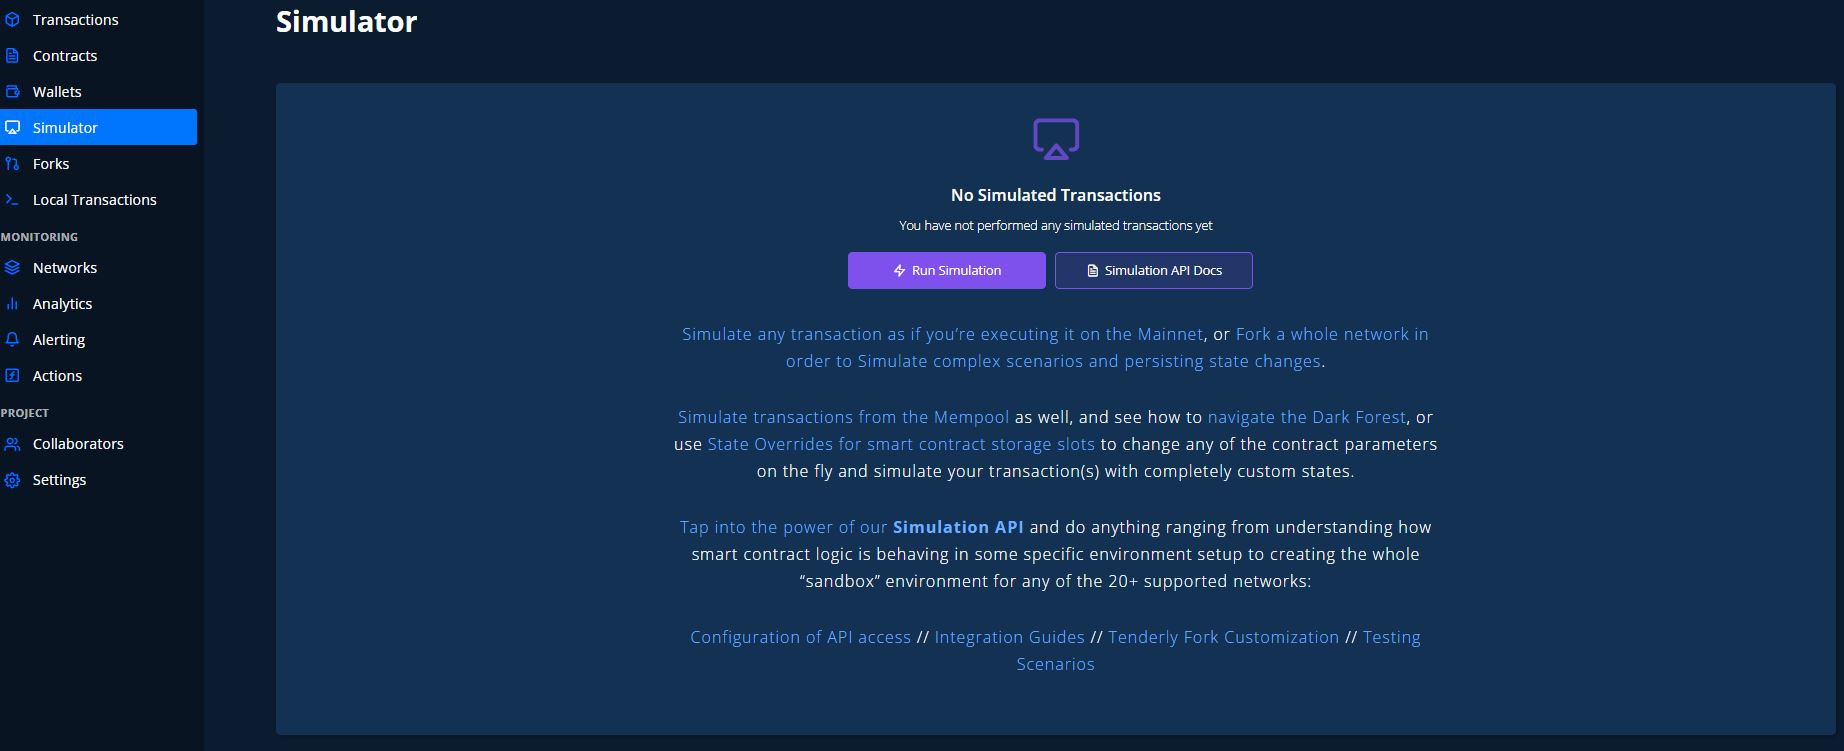
This is the tool I use to run possible scenarios on an already deployed contract. People having problems withdrawing from a contract. Obviously they aren't going to give me their private keys to the admin wallet, so I will have to "imposter" them to simulate like if I did. Let's click on "Run Simulation"
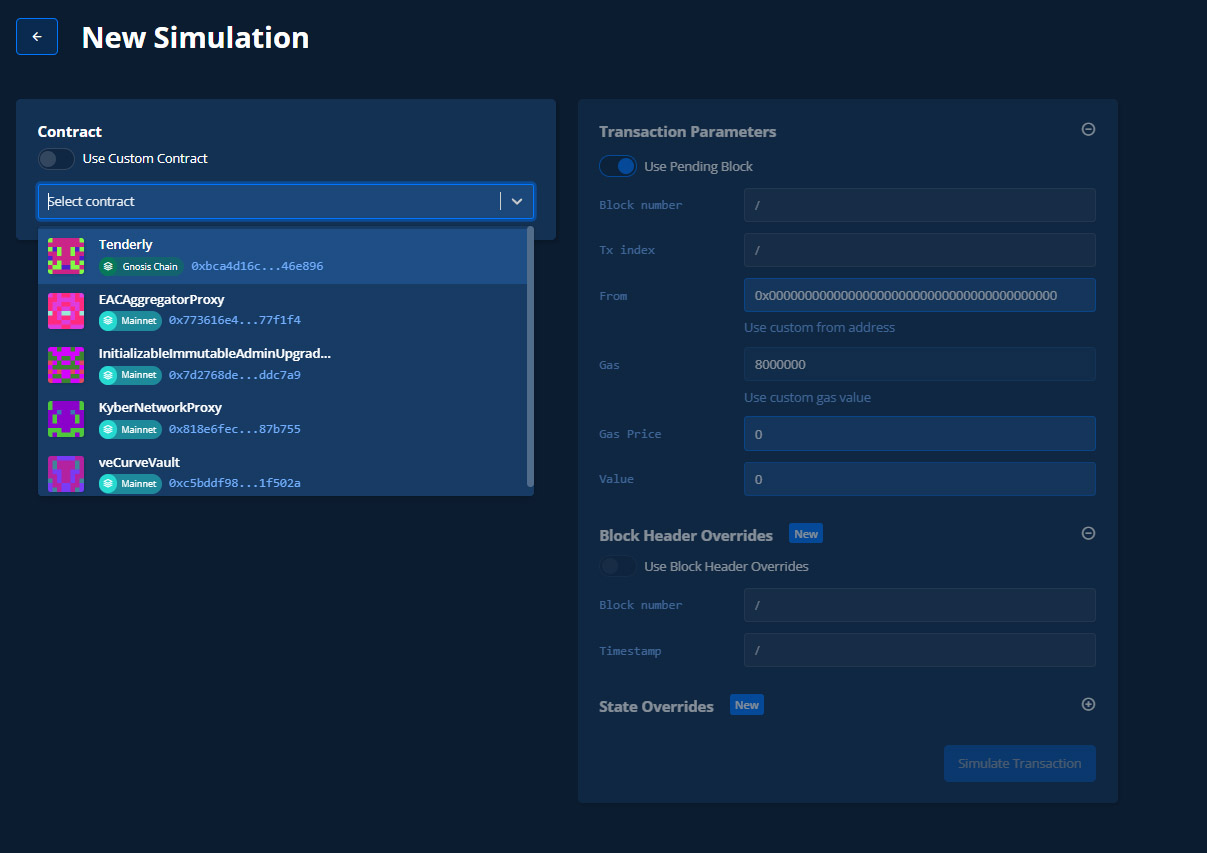
You will want to select the correct contract to do the simulation. I'm already selecting our NFT contract. (You can use customs that are not loaded but you will need an ABI).

After picking your contract, it will ask you what function would you like to simulate. Since we analyzed "admintMint" let's continue to use that one since we understand it.
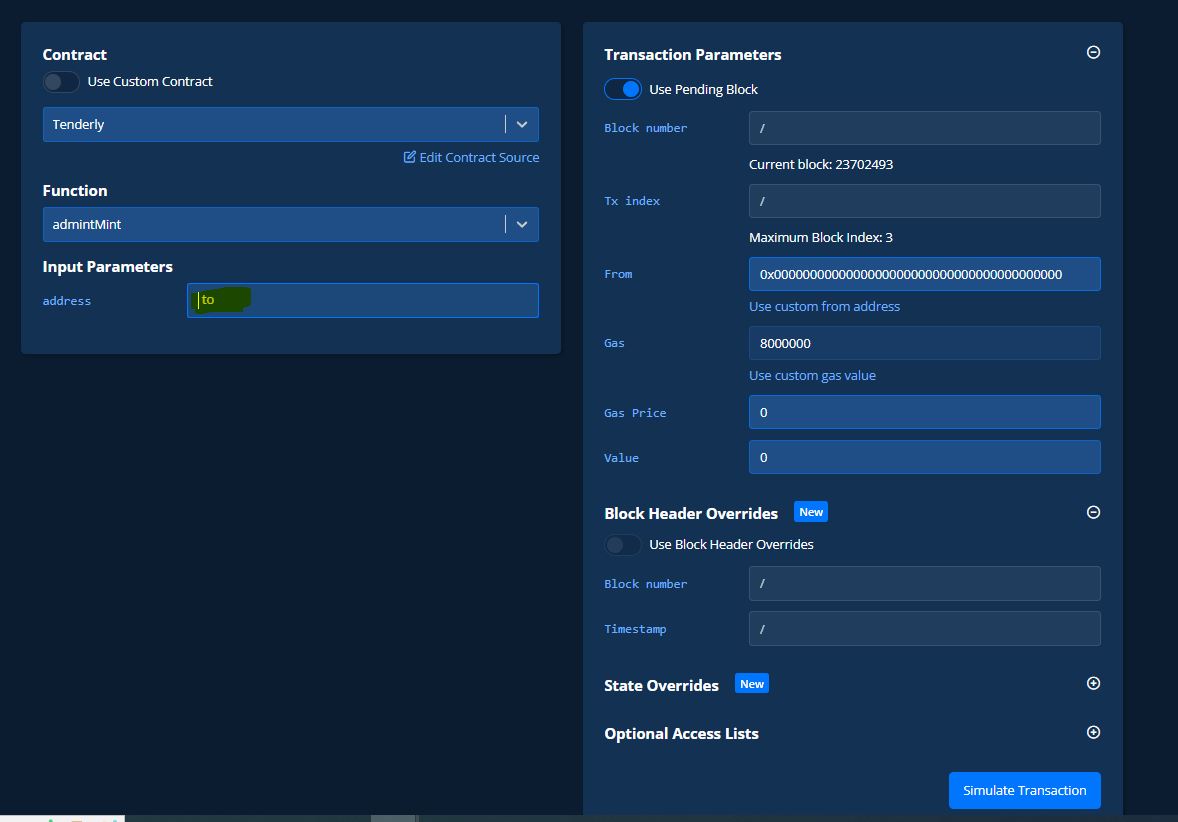
The function requires and "address" argument because this function is used to mint and NFT to an address. You can put any valid address you want. I will put the admin wallet address. 0x4fF3D5428F40AaC5d5569Fc9B315168e34b986F7
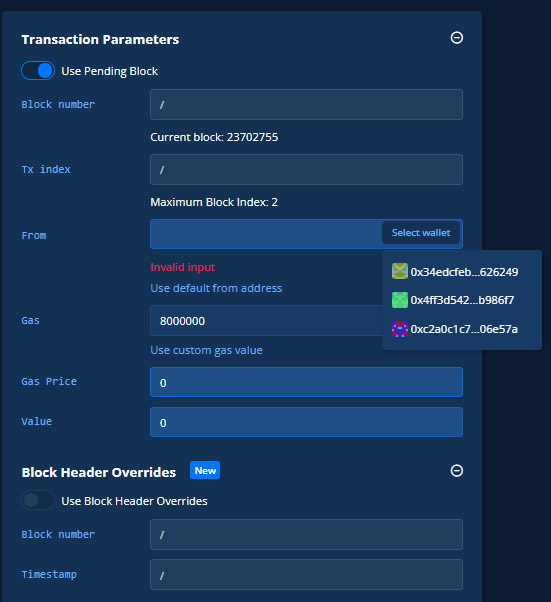
On the right hand side is where all the simulation settings will be adjusted. You could specify a specific block number and Tx index to do something from the past or you can just leave it default and use the current block as I have in the current settings. The "From" is the most important part about this simulation. You will see I have a 0x0 address in the from currently. Remember, anybody calling the admintMint function needs to have those permissions or the transaction will fail. Let's go ahead and run it and see what happens.
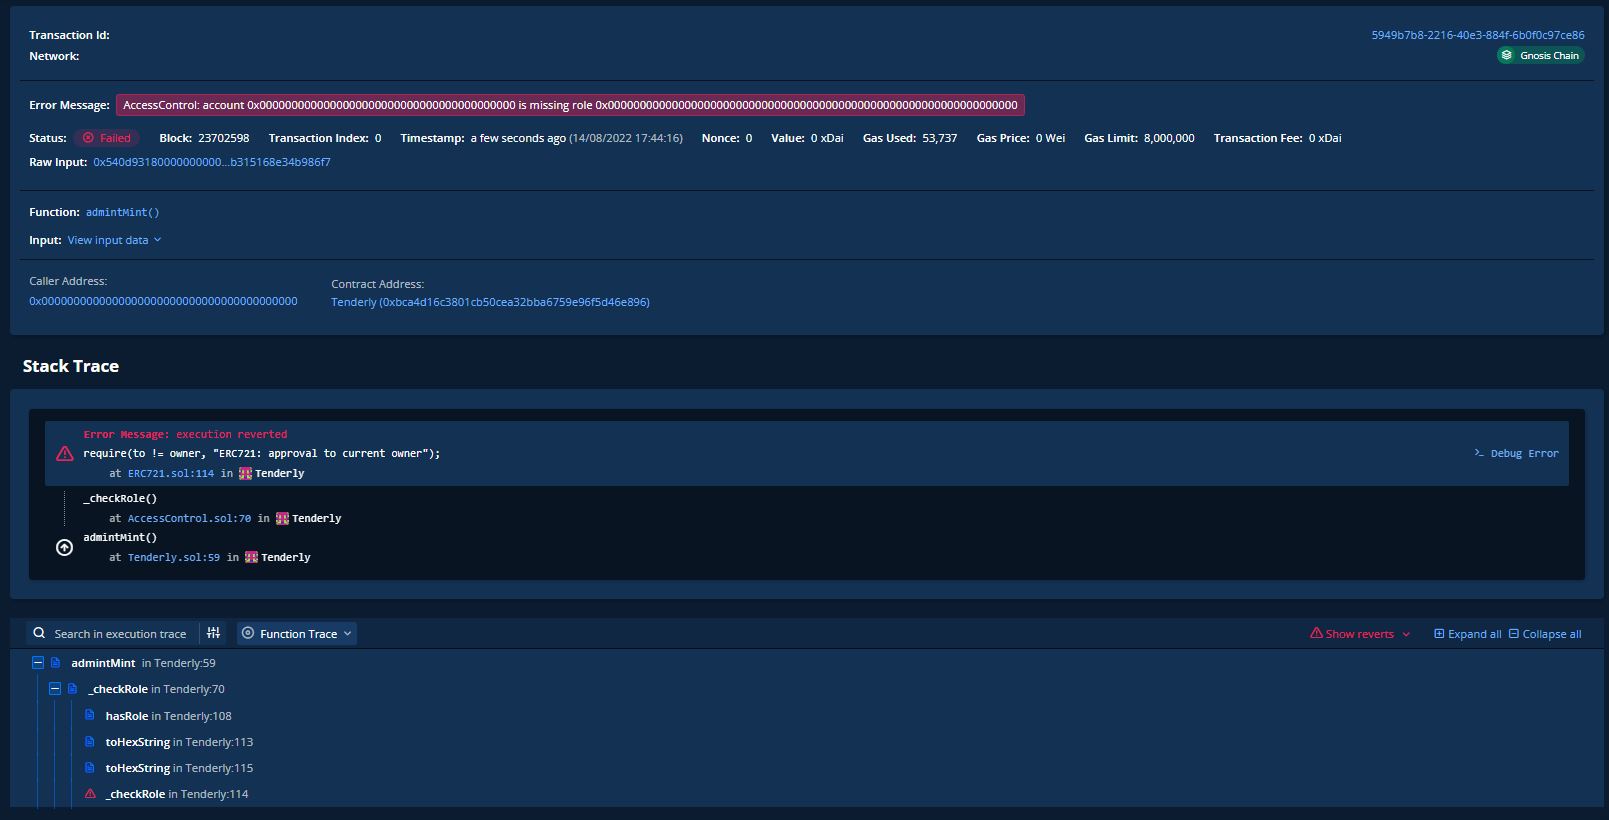
As expected, the simulation failed in the _checkRole function

Let's click on the debugger on the failure for a deep detail
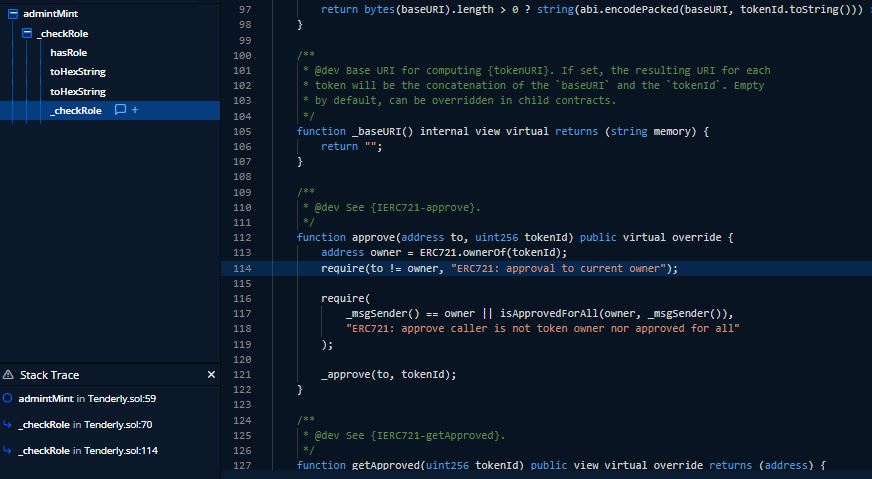
As we can see, it goes down the deep list of the code step by step and shows us exactly where the error happens and what line of code it is. This greatly helps us with any logic errors that may occur in complicated contracts that don't give clear error when things go wrong. It's obvious that this wasn't going to be the right caller, so let's fix that by putting in the right caller address. On the left hand tab, click on "Wallets"
Here, we can add wallets address to be stored for later use. You can use them to run simulations or to monitor activities.
Here is the list of addresses that have access to the contract:
Admin: 0x4fF3D5428F40AaC5d5569Fc9B315168e34b986F7
Minter: 0xC2a0C1c7FCeb9F5366b64Ab35E5dce25c106e57a
Dev: 0x34edcFeb2fC02f19e510E70BB969432d9c626249
Reminder to pick the chain on the contract you are working on. Not to worry, these wallets are just burners that have no value to them.
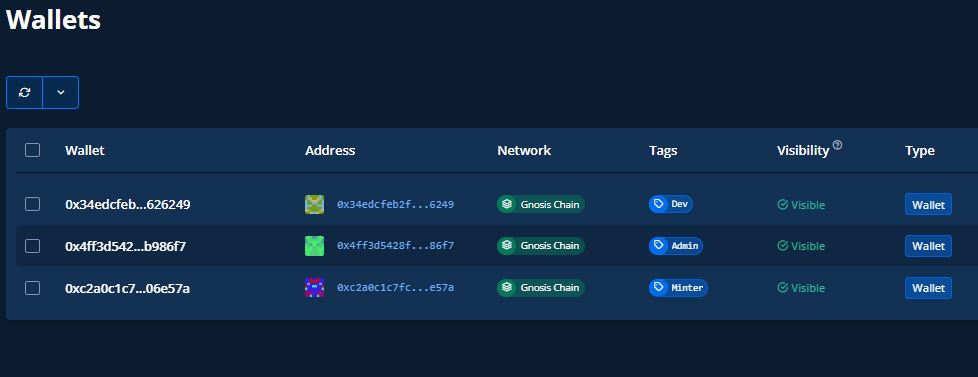
Once you import them in, I advice to Tag your wallets to understand what each one does or it will just get confusing with random addresses.
Let's go back to the Simulator on the left hand tab and on the upper right, click on "New Simulation"
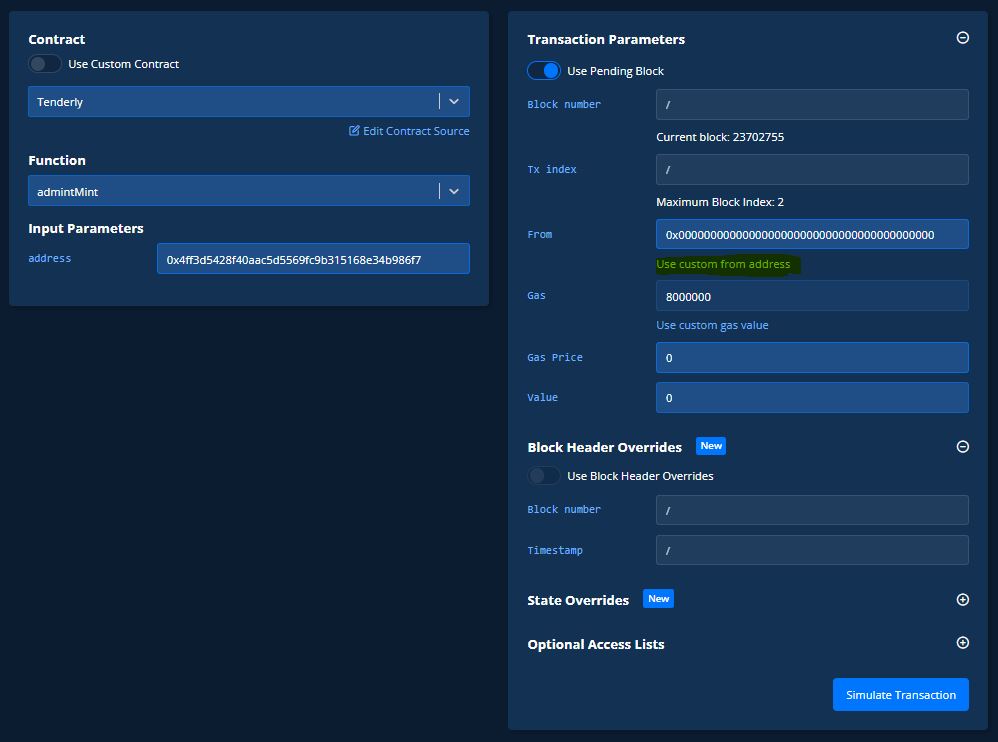
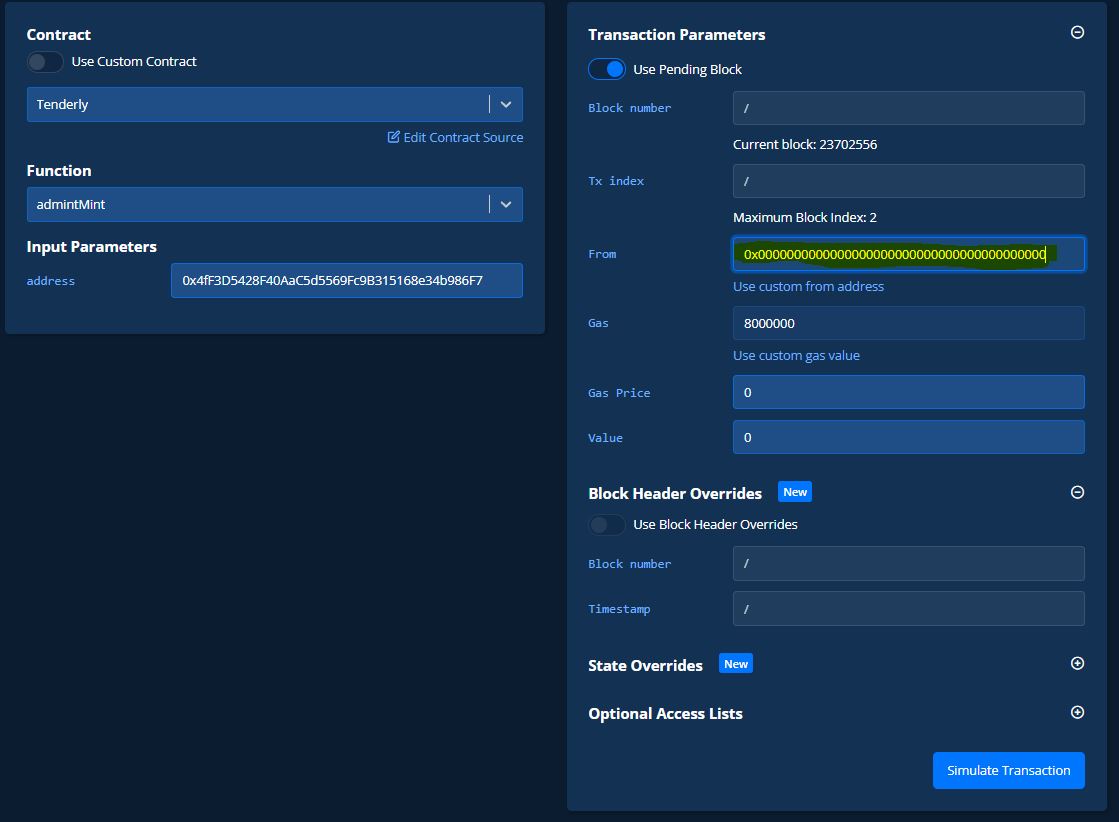
I went ahead and filled out the same information above from the first test, the only difference is that we want to "Use custom from address" when we click that, an option to pick a wallet will show up. The admin wallet is 0x4f one
Go ahead and simulation the transaction again.
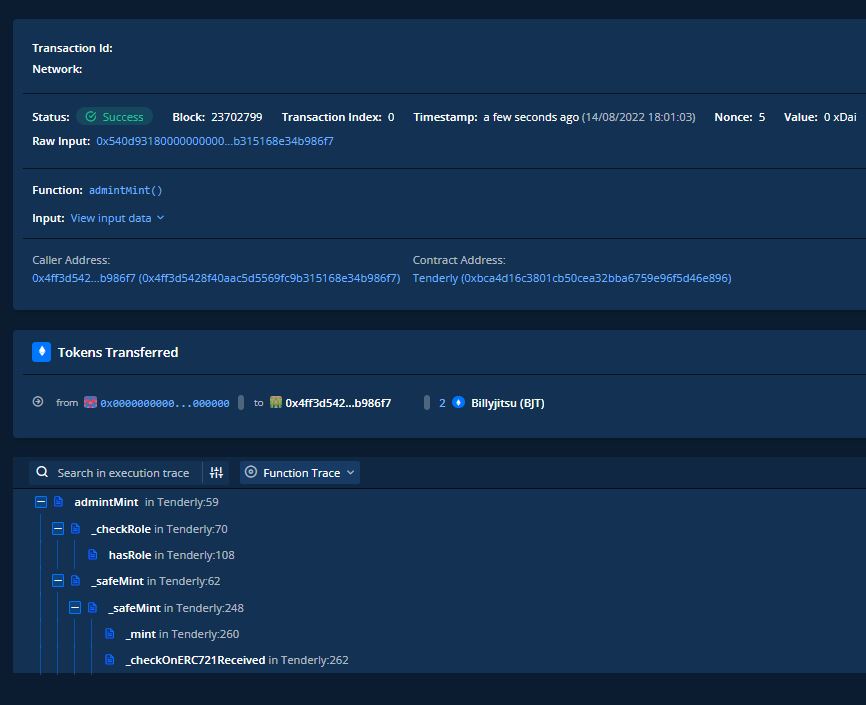
Now with the correct wallet and permission, we were able to successfully run the function in the simulation. Again, you can see how powerful that can be by adjusting gas and certain variable values on a live network. There are way more bugs on this contract that I've shown, but want to give you a little experimentation with the contract to get familiar with the tools.
Alerting
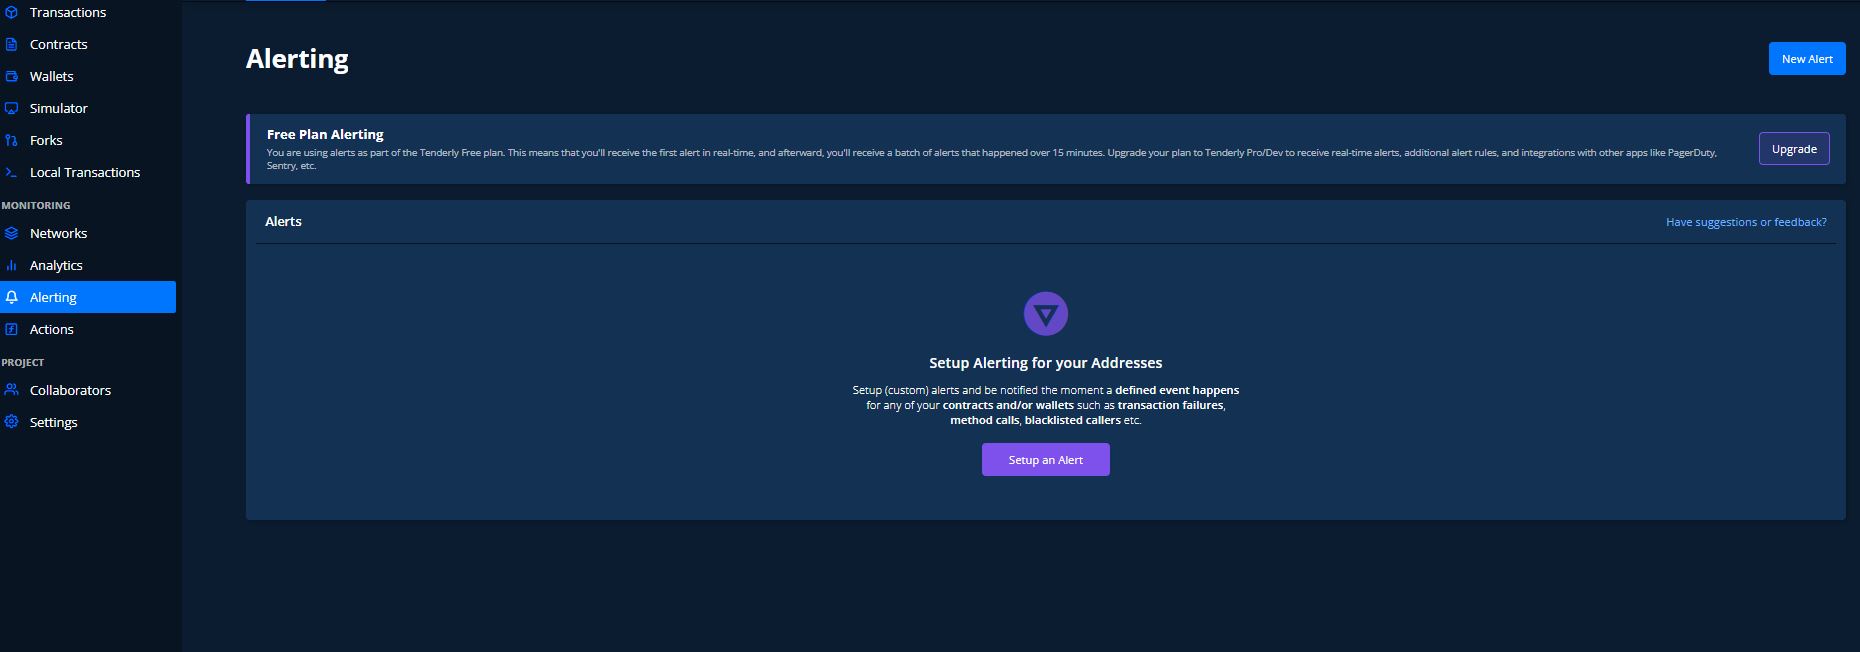
There is one last really nice feature about Tenderly that makes it such a valuable tool and that is Alerting. A user used to have to constantly check to see if a function or event was called to verify safety or just know when to perform and action. Now, tenderly can alert you when the function or events have happened using .. you guessed it "Alerting."
One thing to note is on the free tier, there is a delay on the alerting so if the timing is crucial I would suggest the paid tiers.
Let's go ahead and setup and alert
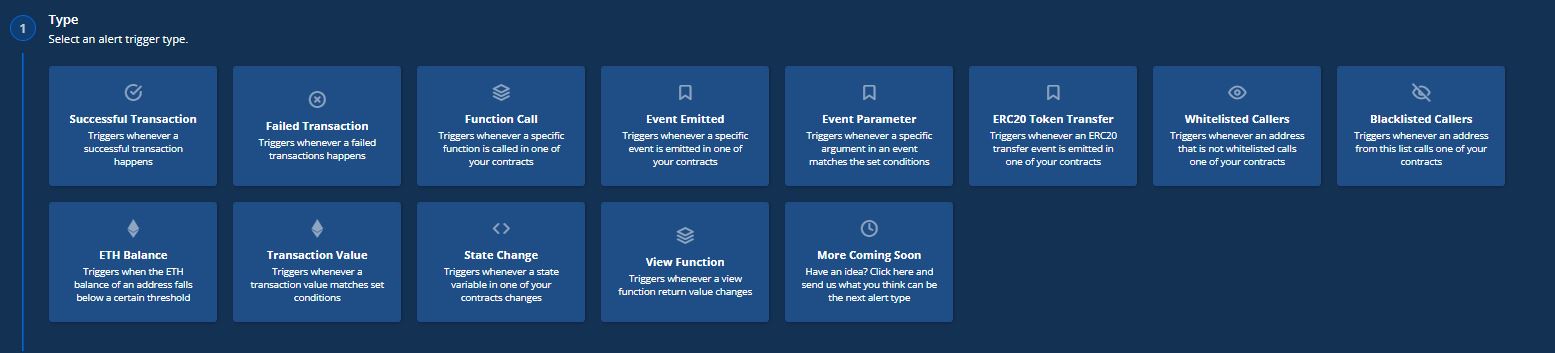
You can see there are quite a few different alert options for various cases. For this demo, I'm going to do "Event Emitted" If you recall on the code, I put an event when a MinterRole Mod minted out and NFT. I want to make sure that this person is not abusing the role and want to keep and eye out for it.
event roleMinted(address minter, uint256 _id);
.......
//Only chosen address can allow mints
    function roleMint(address to) external onlyRole(MINTER_ROLE) {
        uint256 tokenId = _tokenIdCounter.current();
        _tokenIdCounter.increment();
        _safeMint(to, tokenId);

        emit roleMinted(to, tokenId);
    }
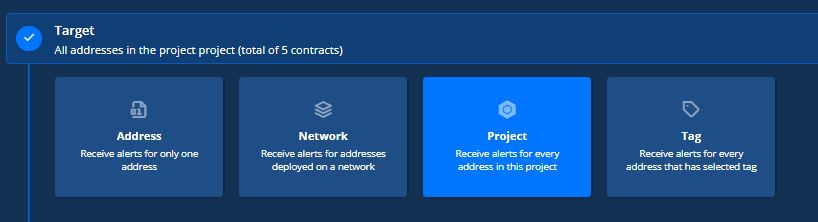
I want to receive alerts for events within this project as I don't know what address that NFTs will be sent to and the only network in Gnosis and I haven't setup specific tags.
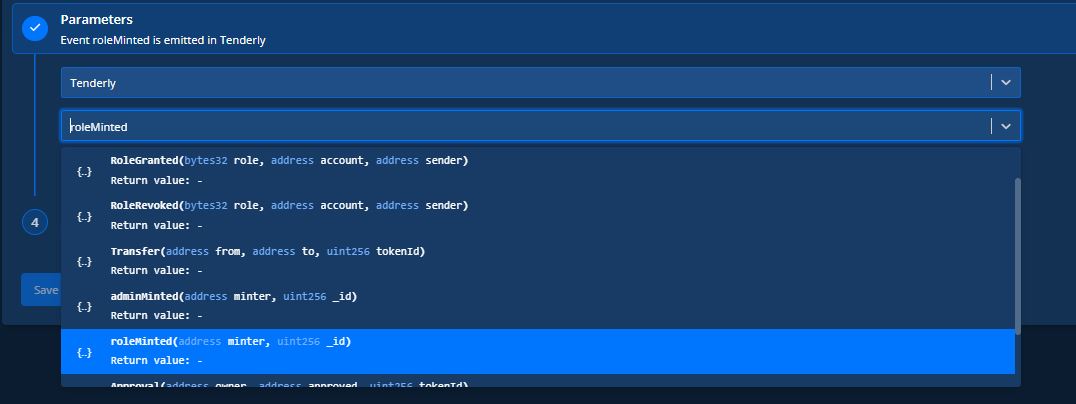
I'm choosing the correct contract and the specific event "roleMinted"
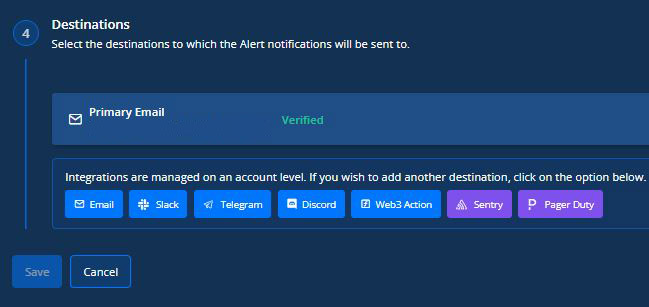
For simplicity, I'm choosing email
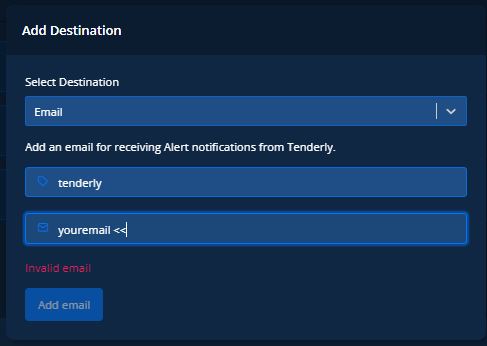
Fill in your email and the tag notice, I just put tenderly for this contract
Make sure to hit save and done!
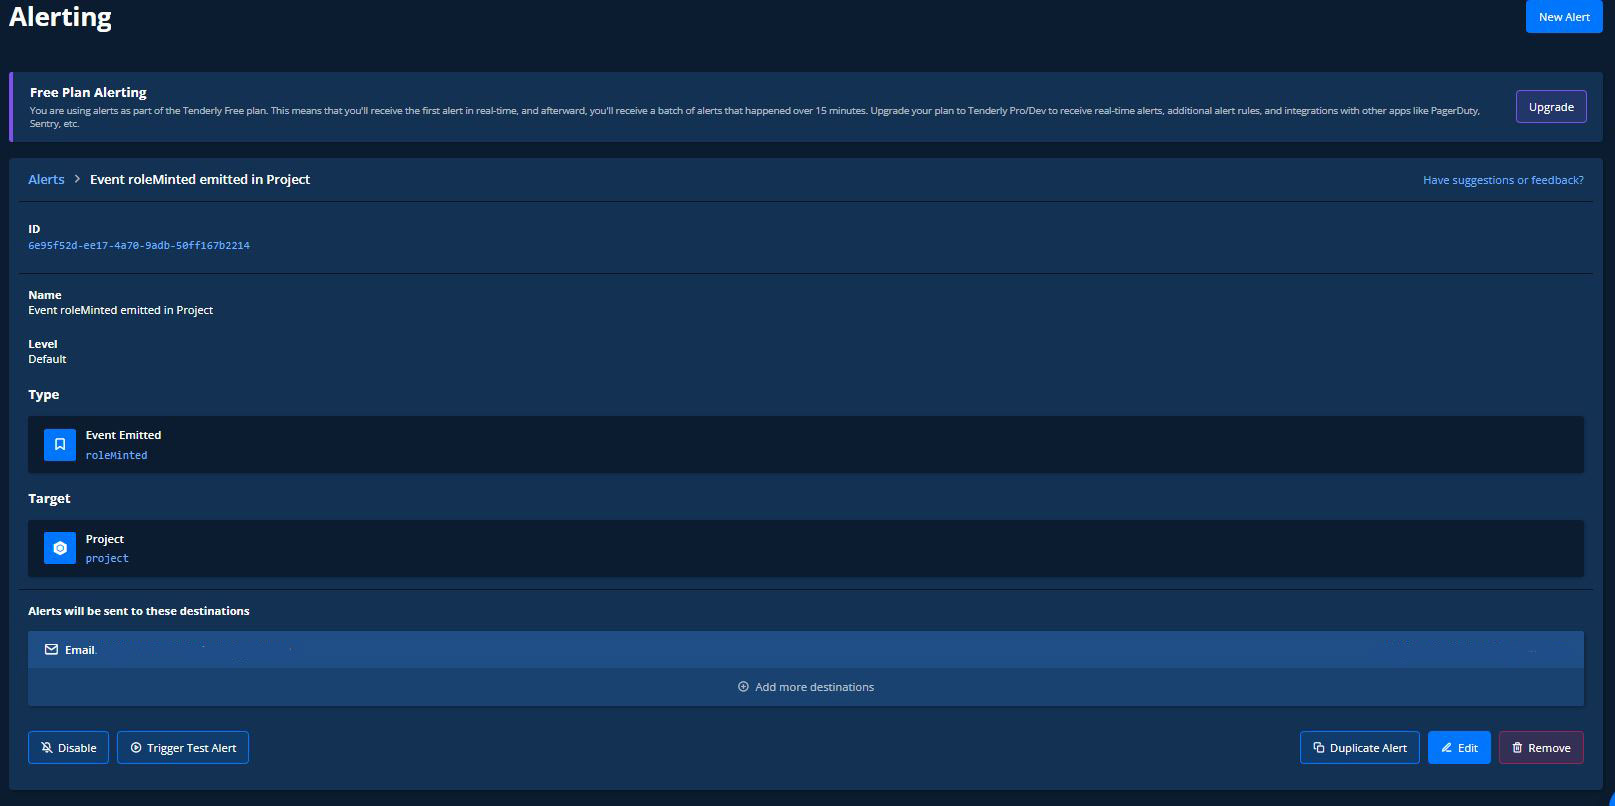
Your alerting monitor is now live. Now you will get updates from the contract when they occur.
Hopefully, this helps you out on your smart contract journey. Many of these tools that I find are really tough at the start because of limited documentation and I had much trouble learning how to use them. So now I make guides that I wish I had. If you have suggestions, please reach out as I love learning new tools.
~Billyjitsu~

